Showing posts with label Panorama. Show all posts

2010-06-18

Nikon 16-35mm f/4 & Heliopan 10 Stop ND Filter


Nikon 16-35mm f/4 lens


This is a sharp lens, Probably not as sharp as the 14-24mm at the corners but still happy with the sharpness. However, the is definitely noticeable barrel distortion at the wide end, around 16-18mm. I don’t have this problem with my 14-24mm.

Samples


Here are some shots I took with the lens, coupled with a Heliopan 10 stop ND filter, at Turimetta Beach last weekend.

LT3_13976

LT3_13960


LT3_13951_2_3

LT3_14018LT3_14015

LT3_13944

LT3_13968

The results were tack sharp with zero colour cast. I really love long exposures and its effect on water.

Distortion

LT3_14010-2
Original
There is noticeable barrel distortion at the wide end. This was taken at 16mm, notice the distortion of the horizon and where it starts dipping at either end.

LT3_14010
Fixed using CS4
No biggie, easily fixed in CS4 using Filter>Distort>Lens Correction. Used +8 and did a little cropping and alignment of the horizon. LR 3 can also be used to correct any lens distortion.

LT3_14010_PTLens
Fixed using PTLens
The example below was fixed using PTLens. I used the plug-in for CS4 instead of the stand alone app. I like the way it fixes the distortion. The difference is subtle but it is there. See if you can spot the difference. PTLens is very easy to install and use.

Thanks again Andy for the heads up on PTLens.
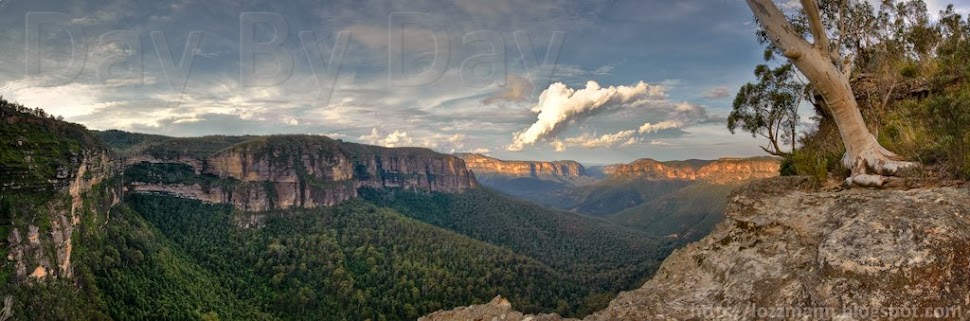
Panoramas

I was interested in seeing if this lens was any good at doing panoramas. So I did a couple in both landscape and portrait modes.

LT3_14047_61_F-2
ISO 200 f8 1/400 16mm

LT3_14047_61_F_PT
Distortion fixed using PTLens.

This 180° panorama consist of 5 separate frames in portrait mode. Each frame contains 3 separate exposures (-1, 0 +1). This was then fused/blended using Photomatix Pro and stitched together in CS4 and tweaked in LR 2.7. Actual size is 5759 x 2881.

LT3_14107_127_F-2
ISO 200 f8 1/400 35mm
This 180° panorama consist of 7 separate frames in landscape mode. Each frame contains 3 separate exposures (-1, 0 +1). This was then fused/blended using Photomatix Pro and stitched together in CS4 and tweaked in LR 2.7. Actual size is 10985 x 2373.
I am very happy with how both the panoramas turned out.


Conclusion

If you are still trying to decide whether to get this lens (16-35mm) or the 14-24mm. I recommend that you get this one. It is tack sharp, cheaper and much lighter. This would be an excellent lens for travelling.

It is also much easier to get filters for this lens. You can use either screw-on filters, as it has a 77mm thread, or opt for square/rectangular filters made by Lee or Cokin.

If I didn’t already have the 14-24mm I’d be happy with just this lens. Besides being tack sharp, I really like the colours and contrast this lens produces.

Turimetta Beach – North Narrabeen


Map picture

2010-01-06

Newport Tidal Pool

Went out to for an evening/dusk shoot at Newport Tidal Pool. I really needed to do more tests with my Cokin X-Pro filter setup. All the shots was taken using 2 x Cokin X-Pro filters stacked. My feet, socks and shoes got a thorough soaking. I just wished the swell was larger and more frequent. The long exposure wave shots would have had more oomph! Should really do this in the early morning when the tide is high.


Newport Tidal Pool


ISO 200 18mm f10 13 secs

This was my favourite shot from the entire shoot. This was taken towards the end of the shoot. I really love how the surface of the tidal pool turned out, so smooth.


HDR

LT3_09220_1_2 LT3_09209_10_11


ISO200 24mm f22 2 secs                       ISO 200 17mm f22 2.5 secs


I also tried a couple of HDR shots. Each shot consists of 3 separate exposures [ -1, 0 +1 ], tripod, tone mapped using Photomatix Pro and tweaked in LR 2.5. I like to keep my HDR as realistic as possible.

LT3_09326

ISO 200 14mm f16 4 secs


LT3_09248

ISO 200 16mm f22 1.6 secs

There was way too much daylight when I was trying to get the long exposure shot of this wave receding. I had to stop down to f22 just to get 1.6 secs.


LT3_09334

ISO 200 16mm f16 15 secs


Panorama


LT3_09168-Edit

ISO 200 14mm f16 1/50 secs

This is a 180° panoramic shot of the beach and the tidal pool. I should have shot this in portrait mode like I normally do. This pano consists of 8 separate shots taken in landscape mode, stitched using CS4 and then tweaked in Adobe LR 2.5.


Newport Tidal Pool - Northern Beaches

2009-10-31

Kirribilli & Milson’s Point

I wanted to do a night shoot and try my hand at doing night panoramas, night HDR and some long exposure shots of anything spinning with coloured lights, e.g. Ferris wheel at night. The only Ferris wheel I know of is at Luna Park, Milson’s Point. As luck would have it, just as we setup for the shot, the Ferris wheel stopped rotating and closed for the night.


LT3_06761-Edit_filtered

I took 3 exposures for this HDR (-1, 0, +1). I then tone mapped with Photomatix Pro. The water did not come out very well, there was some noise in the shadow areas. I selected an exposure that had the best reflections and brightest colours in the water. I imported into CS4 as a layer, added a mask and with a very soft brush with an opacity of around 50%, carefully painted out the bits of the water that  did not look good.  

LT3_06831-Edit


Selective colouring, I exported it from LR 2.5 to CS4 and duplicated it. I converted top layer image to BW and I applied a mask to it. Using my Wacom tablet I set the opacity set to about 50%, selected a big soft brush. I then slowly painted out just the puddle of water to reveal the colours of the bottom layer.


LT3_06842


This one was taken from Milson’s Point adjacent to Luna Park’s Ferris wheel. This is actually 2 exposures blended together. The 2 towers of the Luna Park entrance were badly blown out when I used matrix metering.  I selected 2 exposures and exported them to CS4 as layers. I applied a mask and painted out the sky and water on the top layer to reveal the colours from the layer beneath.

LT3_06796-Edit


Lastly, I did a 180³ night panorama. I decided that the best spot to create the panorama was from Kirribilli which will includes the Sydney Opera House, the city skyline and Sydney Harbour Bridge. It was a real shame that some of the lights on the bridge were not working. This panorama consisted of 8 individual shots taken in portrait mode, stitched together with CS4 and tweaked in LR 2.


2009-10-04

Acratech Levelling Base

The main reason I bought this was to do panoramas. I was sick of spending up to 10 minutes trying to get the tripod level for each pano shot. Now it just takes literally takes less than 10 seconds to get both my tripod base and my ballhead dead level.


The built quality is excellent, nice anodised finish and best of all only weighs about 250g. I really love the huge round spirit level as it makes it so easy to get the tripod level accurately and quickly.

Check out the large round spirit level


The large knob makes it so easy to loosen and tighten the levelling base. It also has a nice rubberised coating on it.


Love the large rubberised knob


Another view of the levelling base, as you can see the workmanship and finish is of a high standard.

Excellent build quality and finish

I have used it for a couple of weeks now and I am very happy with it. It is no longer a chore to take multiple pano shots as the levelling base makes it so easy to move around. With a level tripod it get rids of the staircase effect giving you more of the photo with little or no cropping required and perfect seamless stitching.

I can highly recommend the Acratech levelling base to anyone. At $150 USD I reckon it is money well spent.

Examples


Here are some of the panos from my testing of the Acratech levelling base.


Sydney Opera House - This 180° HDR Panorama consist of 7 separate shots in portrait mode. Each shot contains 3 exposures (-1, 0 +1), tripod, tone mapped using Photomatix Pro, stitched together in CS4 and tweaked in LR 2.0

View of Circular Quay from the Sydney Opera House - This 180° HDR panorama consists of 7 separate shots in portrait mode. Each shot contains 3 different exposures (-1, 0 +1), tripod, tone mapped using Photomatix Pro and stitched together using CS4 and tweaked in LR 2.0

Campbells Cove, Sydney, Australia - This 360° Panorama consists of 15 separate shots in portrait mode and stitched together using CS4 and tweaked in LR 2.0


Here is my pano setup - The Acratech Levelling base attached to my Really Right Stuff BH-40 ballhead with a Really Right Stuff nodal rail.


Go here for more info on the Acratech levelling base.

2009-04-11

Govetts Leap, Blue Mountains

Here are some photos from my recent trip to Govetts Leap in the Blue Mountains on Good Friday. Not a great idea in hindsight since took us over 2.5 hours, hours to get there as there was a heap of traffic on the road. The trip normally only takes about 1.5 hours. It appears lot of people were trying to get out of Sydney during the Easter break.


We started off at Govetts Leap lookout and then went for a quick hike along the Cliff Top track. It was quite a challenging hike for a very unfit person like me.


It was very tough climbing back up those steps. Finally got back to Govetts Leap at around dusk. Just in time to get the shot below.


If you are interested you can checkout more of my shots here.

2009-03-26

My first attempt at Panoramas

I've always wanted to learn how to do panoramas. For some reason I always thought that it was too damn fiddly so I filed it in the too-hard basket. Anyway my interest was peaked after a friend sent me his attempt at panorama. I noticed quite a few alignment problems, which I later learnt were cause by parallax errors. I wondered if I could do better.

I did a lot of reading on the internet on that topic and there are heaps of info on the causes and how to eliminate it. I first had to wrap my head around terms like nodal point, rotational axis and parallax errors. I later found out that the correct terminology is entrance pupil and not nodal point. There are loads of information and tutorial on how to achieve it.

I was salivating over a pano package from Really Right Stuff (RRS) could not justify paying over USD $360. After some thinking and I realised that I could use my panning BH-40 Pro II ballhead and MPR-192 rail from RRS.


Really Right Stuff MPR-192 rail


Really Right Stuff BH40 Pro II ballhead

Requirements

1. Calculate entrance pupil of lens. The entrance pupil of the lens must be directly above the rotational axis of the tripod to negate parallax errors.

2. Tripod - preferably a sturdy one.

3. Panning ballhead or a panning base. Excellent, the BH-40 has a panning base.

4. Slide rail. Luckily for me I had an old RRS MPR 192 slide rail which I originally bought to do macro photography but was not suitable as the movements were not smooth enough.

Entrance Pupil

This is how I found the entrance pupil of my Nikon 14-24mm. I place my speaker stand in the foreground and align it with a door frame in the background or any straight vertical line. I then look through the view finder and panned the camera left and right and adjust the position of the camera, by moving it either backwards or forwards on the rail. This process is repeated until the foreground and background objects stop moving when panning the camera left and right.

My D700 mounted on the RRS MPR 192 rail. As you can see from the photo above, the entrance pupil for the Nikon 14-24mm is towards the front of the lens roughly where the focus ring is.


The tripod must be dead level. This is the hardest part of the whole exercise, it takes a bit of time and lots of patience. It can be very frustrating especially when perched on a rock. I discovered that the spirit level on my Manfrotto 055PROB was crap. I wasted a few hours scratching my head wondering why I couldn't get the tripod level. I ended up using a two axes spirit level instead.

2-axes spirit level. You can get them on ebay.


Once the tripod is ready, make sure that the ballhead is level. The spirit bubble on the quick release plate is accurate but I double checked using the 2-axes level. Now you are ready to take some shots. Since I had no idea what I was doing I just took multiple shots, anywhere from 3 to 13 shots, in both portrait and landscape mode.

Panorama shot in portrait mode. This one comprise of 3 separate shots.


Panorama shot in portrait mode. This one comprise of 5 separate shots.


Panorama shot in landscape mode. This one comprise of 5 separate shots.


Panorama shot in portrait mode. This one comprise of 8 separate shots.
Click here for a larger view


Panorama shot in portrait mode. This one comprise of 13 separate shots.
Click here for larger view


All the shots were taken with my Nikon D700 and 14-24mm. I use Adobe LR2 and CS4 to do all my adjustments and stitching. I am very please with the results from my first attempt at panoramas. Now I would really keen to do more panoramas and also work to improve my technique.